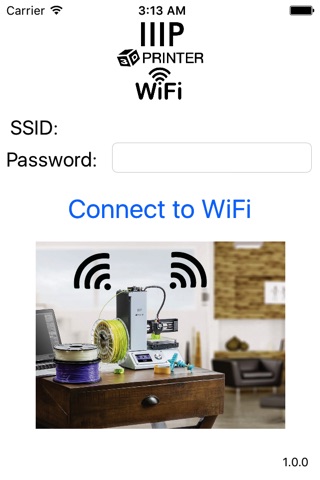

MP 3D Printer WiFi Connect app for iPhone and iPad
Developer: Matthew Upp
First release : 19 Feb 2017
App size: 2.51 Mb
MP 3D Printer WiFI Connect will make connecting your Monoprice Select Mini 3D Printer to WiFi a quick and painless process.
Follow the steps below to get your Select Mini connected to your existing 2.4 GHz wireless network.
1. Disconnect USB cable from the printer
2. Turn on the MP Select Mini.
3. Open the MP 3D Printer WiFi Connect App.
4. Verify the correct SSID is displayed.
5. Enter wireless network password.
6. Use the printers dial and LCD to navigate to the “Move” menu.
7. Press and hold the dial button.
8. Release the button when the “Smart config started” message is displayed.
9. Tap the “Connect to WiFi” button and within 10-60 seconds the process should complete.
The printers LCD will display "Smart config success" when the process is complete.
The iPhone will display "MP Select Mini is now connected to Wi-Fi."
You will also notice the Select Mini has been assigned an IP Address that is displayed at the top of the printers display.
Note: If the "Smart config started" message does not stay after releasing the button you can hold the button down through the whole process and the message will disappear once the Wi-Fi is connected.
Trouble connecting?
If the correct SSID is not displayed, go to the iPhones Wi-Fi settings and switch to the appropriate wireless network.
Wi-Fi and USB cannot access the printer simultaneously.
Disconnect USB cable from the printer if you want to use the Wi-Fi function.
Wi-Fi works with 2.4 GHz b/g/n networks only.
If you have a 2.4 GHz and 5 GHz network using the same SSID(wireless network name) you may have trouble connecting the printer to your wireless network.
For the initial Wi-Fi setup try moving the printer closer to the Wi-Fi router.